Monthly Archives: October 2011

Way to convert PPT to flash video

PPT, as we know, cannot be uploaded on many websites, especially video sharing websites like YouTube. But sometimes we made some excellent PPT files and just want to share it to others on YouTube, how can we achieve it? The best answer must be converting PPT to flash video. In this way, we could well convert PPT to video in high quality as well as keep all the original animations, videos, pictures and sound of the source PPT file. And the most important is we could easily post it on YouTube and other websites like FaceBook.
Next, let’s go over how to convert PPT to flash video.

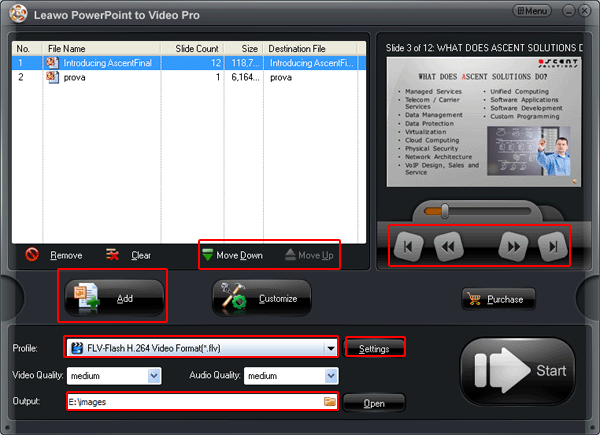
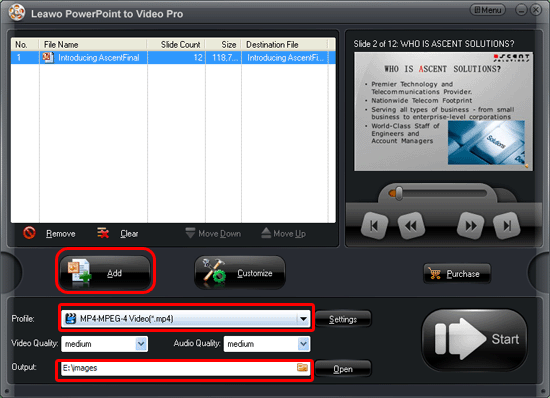
First, you need PPT to video converter and install it on a computer.

Second, just start the program and input the source PPT file.

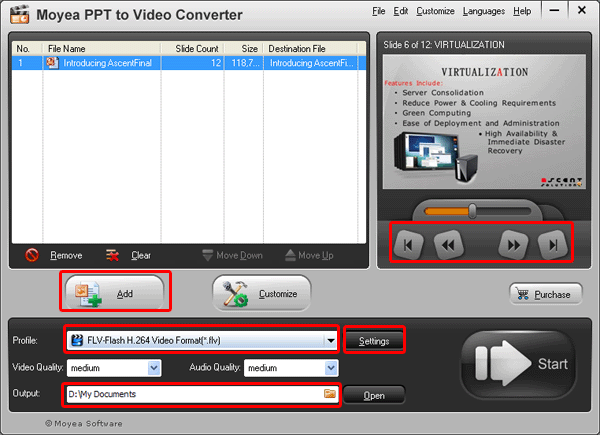
You can view the source PPT file just by clicking the buttons under the view screen. Choose the output video as FLV and designate a folder for the generate video.

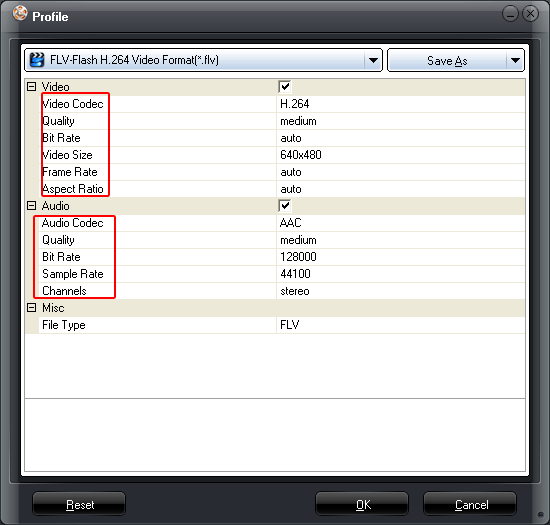
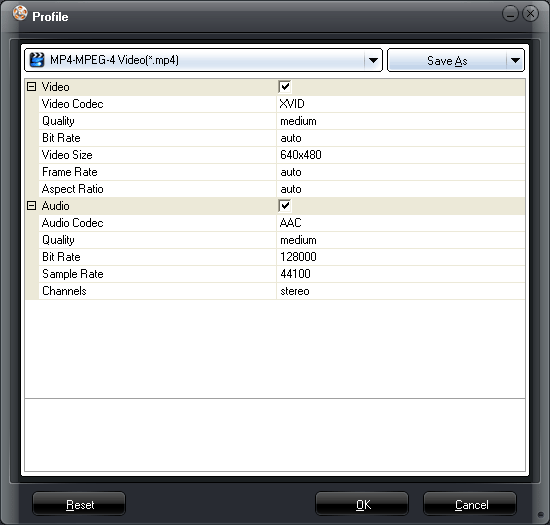
And then, click “settings” to customize the audio and video display effects of the generated video.

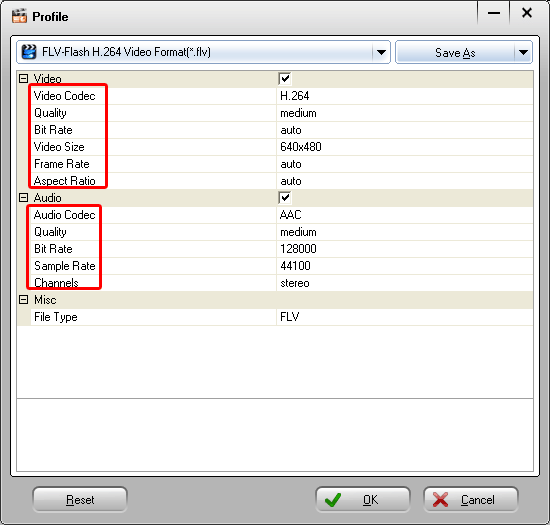
You can customize the bite rate, video size and video codec and some other options here.

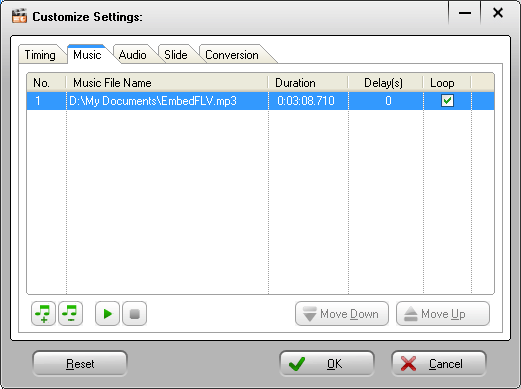
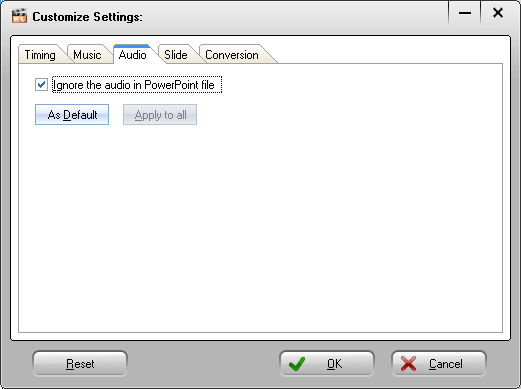
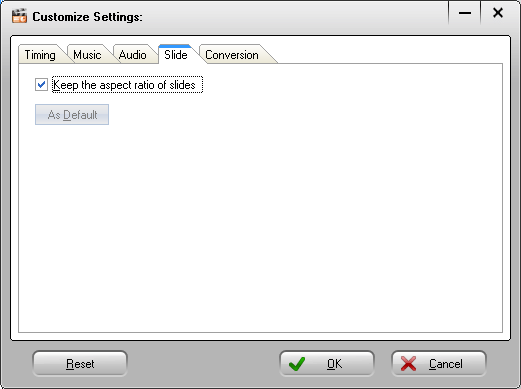
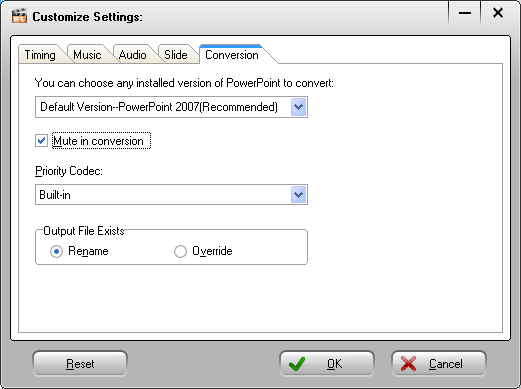
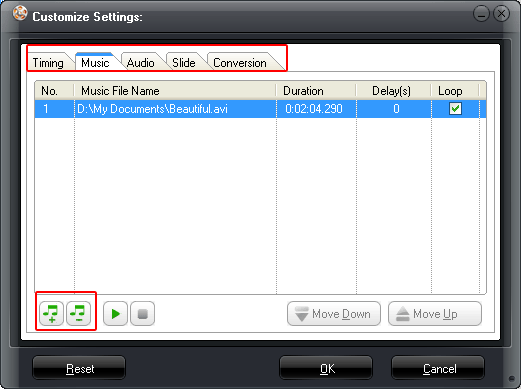
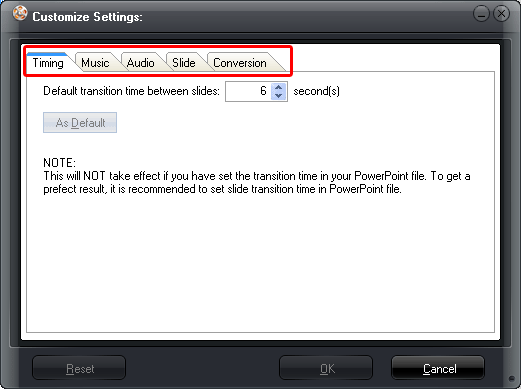
Fourth, simply click “Customize” to customize the timing, music, audio, slides and conversion.

The transition time between slides cannot be less than 6 seconds, or else it will get worse effects. In addition, if you have set it on the source PPT, you needn’t set it here. Choose an appropriate music for the generated video and ignore the audio in the original PPT file.

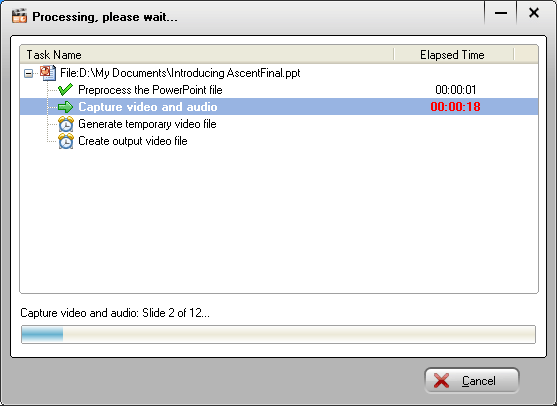
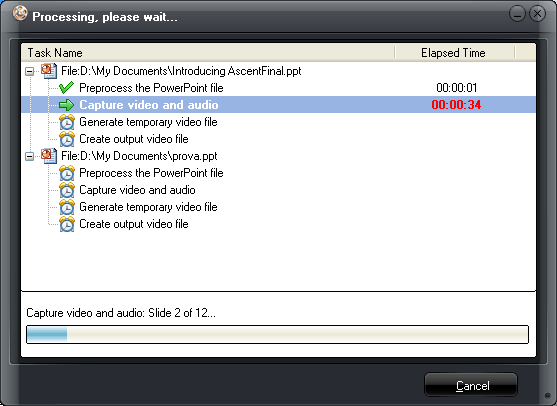
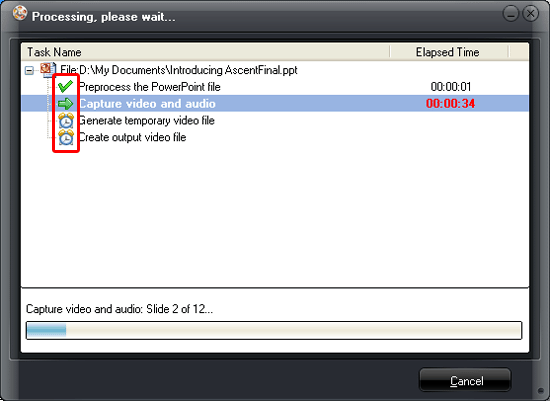
At last, just press “Start” to convert PPT to flash video. The PPT to flash video conversion will be finished in no minute.

Wait until the PPT to video converter open the output folder for you.
Just watch the output video and upload it to YouTube or even your FaceBook account.

How to play PowerPoint on Zune?

Want to watch PowerPoint files on your Zune? This post will show you the way to play PowerPoint files on Zune by converting PowerPoint to video.

As we know that Zune is a portable media player released by Microsoft on 2006. We could use it to listen to music, watch pictures and movies and even get or share multimedia files. What’s more, we could play games on this device. Zune could well support multimedia files like JPG, MP3, WMA and WMA. What’s more, it can be used to watch PPT files after we convert PowerPoint to WMV. So, next we will go over how to convert PowerPoint to WMV so that it could be played on Zune.

Step 1: please download a PowerPoint to video converter and install in to your PC.

Step 2: simply open the program and add the PowerPoint file to it. You can directly click “add” to input the original PowerPoint file.

Then, you are able to preview the PowerPoint file by clicking the buttons under the view screen. Please choose the output video format as WMV and designate a folder for it.

Step 3: click “Settings” to start the audio and video settings of the output video.

Here you can adjust the bite rate, video codec, video size and audio codec and so on. Just adjust the parameters to suit for your Zune.

Step 4: Customize the timing, audio, music, slides and conversion.
Timing

The default transition time between slides is 6 seconds. Therefore, the transition should be more than 6 seconds so that to get better display effects. Of course, if you have set it on the source PowerPoint file, the settings here won’t take effects.
Music

You can add background music for the PowerPoint so that the file won’t be too dull. If you have multiple pieces of music to input, just move up and down to adjust the order.
Audio

Obviously, you can ignore the audio in the PowerPoint file, for example, the audio of special effects.
Slide

You need to keep the aspect ratio of slides.
Conversion

You can also customize the conversion here.

Step 5: Convert PowerPoint to WMV

Just press “Start” to start the PowerPoint to WMV conversion and you’d better wait until the conversion has been finished. Then the program will automatically open the output folder for you, just watch the video and transfer it to Zune.

Tutorial of convert PowerPoint to video

As most portable devices like smartphones, PSP and tablet computers as well as smart TV cannot well support PowerPoint files even though some of them could use Office tools for mobile devices like Quick Office, Keynote and Google Docs, etc. Thus it is quite necessary to find a third-party application that could convert PowerPoint to videos that our portable devices could support as well as keep all the original effects of the PowerPoint file.
It must be a PowerPoint to video converter to complete this task since a PowerPoint to vide converter could perfectly convert PowerPoint to videos like AVI, 3GP, MP4, MOV, MKV, MPEG4, FLV and multiple video formats as well as keep all the animations, videos and pictures of the source PowerPoint file. In addition, it is available to customize the PowerPoint by setting the transition time and add background music. You can also rip audio from the source PowerPoint file.
Hence, let’s learn how to convert PowerPoint to video with a PowerPoint to video converter.

http://youtu.be/czgyUtKbaJ0

With this PowerPoint to video converter, you can convert PowerPoint to video in no minutes and enjoy the PowerPoint file anytime and anywhere.

How to convert PPT to FLV?

Want to share your PPT files on YouTube? Want to watch your PPT on media players? This post will provide you solution to these problems by converting PPT to FLV.

PPT file is a document produced by Microsoft PowerPoint. It has been widely used. We often use PowerPoint to do some slides demonstration, teaching courseware, business promotion, presentation, electronic albums and so on.

To convert PPT to FLV requires little technical skills but just a PPT to video converter which can quickly finish the conversion as well as maintain all the animations, pictures, videos of the source PPT files.

Step 1: get a PPT to video converter and set it up on your computer.

Step 2: simply start the PPT converter and import the PPT files to it.

Next you can preview the PPT files on the view screen and move up or move down the PPT files. Then choose the export video format as FLV and designate a folder for it.

Step 3: audio and video settings

Just click “Settings” to start the audio and video settings of the generated video. You can customize the video size, bite rate, video codec and audio codec here.

Step 4 customize some additional settings

You need just click “Customize” to customize the timing, music, audio, slides and even conversion. You can add background music here and even set the transition time between slides.
If you have set the transition time in the original PPT file, you don’t have to set it here.

Step 5: convert PPT to FLV

Once you have set all the settings, just press “Start” to start the PPT to FLV conversion. The PPT converter will quickly finish the conversion. You should wait until the program open the output folder for you.
Just watch the output video and share it online.

How to convert PowerPoint to Dell Streak 5?

Want to watch PowerPoint on Dell Streak 5? This post will guide you to watch PowerPoint to Dell Streak 5 by converting PowerPoint to Dell Streak 5 supported video formats.

Dell Streak 5 has adopted a 5 inches capacitive touch screen with a resolution in 800*480. It has applied 1GHz processor and 512MB memory storage as well as Android 2.1 operating system. Besides from the support of 16GB SSD, USB 2.0 and 3.5mm earphone interface, Dell Streak 5 could also support Wifi and GPS navigation. As for videos, it could well support H.263, H.264, 3GP, MPEG4 and WMV. Thus, we just need to convert PowerPoint to WMV or MPEG4 when we want to view PowerPoint file on this machine.

Next, we will look at how to convert PowerPoint to WMV.

Step 1: just prepare a PowerPoint to Video Converter and install it.

Step 2: Please start the PowerPoint to Video converter and input the original PowerPoint file.

You are able to click the buttons under the view screen to preview the source PowerPoint file. Then choose the output video format as WMV and specify a folder for the output video.

Step 3: next click “Settings” to set the audio and video display effects of the generated video.

Here, you can customize the bite rate, video size and even video codec of the generated video.

Step 4: after the audio and video settings, you should press “Customize” to customize some additional settings.

You can customize the timing, audio, music, slide and conversion here. What’s more, you could add background for the output video.

Step 5: once all the settings have been done. It’s time to convert PowerPoint to WMV. Please click “Start”, and then you will see the PowerPoint to WMV converting process.

The converting would be finished within a few seconds, just wait until the program open the output folder for you. Now, you can enjoy the output video and transfer it to Dell Streak 5.
Have fun with it on this machine.

How to use Panasonic BW880GKK Blu-ray-player to perform PPT

DMR-BW880GKK is, launched by Panasonic Electronics, a hard disk drive Blu-ray recorder. It is able to record digital TV programs and HD video in lossless way, while the DVD recorder cannot do that.

The industry generally believes that in the future Blu-ray players will become the master of high-definition playback device. And at this stage, the features of the Blu-ray player are relatively simple, pure disc playback has restricted its cost performance. The latest Panasonic DMR-BW880GKK not only perform as Blu-ray Players during the discs, but also has burning, high-definition video copy and other functions, increasing product cost performance in the case of constant price. As a good player, it has the basic characteristics of the output image, high definition, good color reproduction, comprehensive audio support, etc. Furthermore, this Blu-ray drive also has a large capacity hard drive 500G and can support high HD video recording for easy collection.

Panasonic DMR-BW880GKK Blu-ray player supports BD / DVD, SD cards and USB playback disc player, supports 1080P digital output, transmitting  high-resolution screen, recording and playing full HD quality, reproducing beautiful clear image. It is not only compatible with Blu-ray recorders BD-R/BD-RE, but also compatible with DVD R / DVD-R, DVD R / DL, DVD-R/DL, DVD RW / DVD-RW, DVD-RAM. With advanced variable bit rate quality video, high-speed copying, you can burn BD and DVD format discs. It has three utility functions: a manual recording, DV input automatically burn and AV smart burn. In addition, the Panasonic DMR-BW880GKK can easily record the HD (AVCHD format), SD (MPEG2 format) video in Panasonic cameras and copy to HDD or disc in permanent preservation.
Therefore, to watch PPT on DMR-BW880GKK we only need to convert ppt convert video or DVD / Blu-ray Disc format.

Before conversion, we need to prepare Moyea PPT to DVD Burner Pro and install it.

If we want to convert PPT to DVD/Blu-ray, the steps are as follow:

Step 1. Import PPT files

Step 2. Output Blu-ray/DVD options (Advanced Settings)

Step 3. Customize Blu-ray/DVD menu

Step 4. Add Music

Step 5. Burn to DVD/Blu-ray

If we want to convert PPT to video, the following is the operation:

Step 1. Import PPT files

Step 2. Output video options (Advanced Settings)

Step 3. Add Music and Record voice

Step 4. Export video files

After conversion, just copy and paste the converted files to this machine. Then, we can preview the PPT on DMR-BW880GKK


How to watch PPT files on Panasonic P42GT20C 3D Plasma TV

Want to watch PPT files on plasma 3D TV? This post will teach you how to watch PPT files on Panasonic P42GT20C 3D Plasma TV by converting PPT to video.

Panasonic P42GT20C plasma TV is very suitable for plasma enthusiasts and is also a good choice for consumers who focus on picture quality. It has a full HD 1080P resolution, NeoPDP Plasma TV LCD panel display capability, and 600Hz sub-field drive image processing technology, making it even splendid and outstanding. What’s more, this is a 3D TV, not only is capable of playing native 3D images, but also has the function to convert 2D to 3D effect, thus it is quite for us to enjoy pictures, videos and even PPT files.

Converting convert PPT to AVI which is supported by this machine is quite simple if we use a PPT to video converter. Next we take a look at how to convert PPT files into AVI format.

Step 1. Prepare a PowerPoint to video converter and set it up to your computer

Step 2. Launch the PowerPoint to video converter and click “Add” button to import original PPT files.


You can see the source PPT file via clicking the button under the view screen. Then you need to select the output video format as AVI and designate a folder for generated video.


Step 3. Click “Customize” button to customize timing, music, slide, audio and conversion.

You can add background music for the generated video as you like. If you have set the transition time for the original PPT, you are not necessary to set it here.


Step 4. Click “Settings” button to set video and audio parameters for the developed video.


Step 5. Click the “Start” button to convert PPT to AVI. The process will be finished in a few minutes, and will automatically open the designated folder for converted video.


Now, you can transfer the AVI video to Panasonic P42GT20C 3D plasma TV and enjoy it.


Canon in Malaysia released the latest professional digital SLR cameras

Yesterday afternoon, at 2:00PM of 18 October, in Kuala Lumpur, Malaysia conference, a model displayed the newest camera EOS-1D X. Canon camera in Kuala Lumpur, Malaysia matched up to Canon Corporation in Tokyo, Japan jointly and announced a new generation of professional digital SLR camera EOS-1D X. As the adoption of the 18.1 million effective pixel full-frame sensor, and possession of ultra high-speed continuous shooting functions of the top digital SLR, EOS 1D X can be considered as the collection of EOS 1Ds MARK III and EOS 1D MARK IV. At the same time, the design of full-frame ultra-high speed continuous shooting is exactly the same with the launch of the D3 and Nikon D3s. To some extent, the performance of EOS 1D X is not only to just achieve, even beyond our expectations on next generation of Canon’s flagship SLR. The product will be officially on sale in March 2012.

Let’s take a glance at some new features and new technologies of this new camera.

1. About 18.1 million pixel full-frame
35mm full-frame CMOS image sensor owns approximately 18.1 million effective pixels
2. 14 frames per second
It can arrive at Ultra High Speed about 14 frames per second.
3. ISO 204800
It enables ISO photosensitivity to select 13 levels among the range of ISO 50-204800.
4.1920 × 1080 pixel full HD picture quality
With full HD quality video, EOS use the new compression so as to meet the professional needs.

The new functions and new technologies, which EOS-1DX takes possession, are far more than the above points. Although it will be a best choice for some professionals, it still cannot support PPT file well. So if it is to run PowerPoint files, just need to convert PowerPoint files to MOV,HD or some other video formats that this machine can support.


Step 1. Download the PowerPoint to video converter and install it.


Step 2. Click the “Add” button to import the original PPT file or multiple PPT files


Then you can see the PPT file in the above view screen by clicking the button.

Step 3. Select the output video format and create or designate a folder for the output video.

Then you can click “Settings” to set the video and audio parameters of the developed video. There is HD output format, you can set this format so that after conversion you can enjoy the 1920 × 1080 pixel full HD picture quality of EOS-1DX.


Step 4. Click “Customize” to set some additional settings, such as timing, music, audio etc. You can insert music as background for the developed video or make a selection of the transition time between each slide.


Step 5. After settings, click “Start” to convert PPT to video. The interface will show the conversion process. When the process is finished, the designed folder for output video will be automatically opened.


Then, you can copy and paste it to EOS-1DX and enjoy it.


How to play PowerPoint files on LG Optimus 3D P920?

Have you ever tried to watch PowerPoint files on LG Optimus 3D P920? This paper will share you the best way to watch PowerPoint on this machine by converting PowerPoint to video.

Before we talk about how to convert PowerPoint to video, we’d like first review the main features of this machine.
LG Optimus 3D P920 has adopted a 4.3 inches touch screen whose resolution has been 800*480 pixels. Also, it has applied the Google Android OS v2.2 and the storage combination of 512MB ROM and 512MB RAM. It has a built-in virtual QWERTY keyboard as well as built-in GPS navigation. Besides from the support of Wifi and Bluetooth 3.0, it could also support Micro SD card and App2SD. What’s more, it has equipped with a 5MP camera which maximum could take 2592*1944 pixels photos, 1080p 2D videos and 720P 3D videos. The battery is 1200mAh. As it cannot support PowerPoint files, we have to convert PowerPoint to video if we want to watch PowerPoint files on this machine.

Now, let’s look at how to convert PowerPoint to video with a PowerPoint to video converter.

Step 1: Prepare
You need download a PowerPoint to video converter and install it on your computer.

Step 2: Add PowerPoint file
Please start the program and import the PowerPoint file by clicking “Add”.

You might preview the PowerPoint file on the view screen. Then choose an appropriate video format for the output video and designate a folder for it.

Step 3: Customize
Simply press “Customize” to set the timing, slides, music, audio and conversion of the exported video. You are able to add music and set the transition time for the whole PPT.

Remember if you have set the transition time on the original PowerPoint file, you don’t have to set it here.

Step 4: audio and video settings
Now, you could click “Settings” to start the audio and video settings of the output video.

Step 5: Convert PowerPoint to video
When all the settings have been achieved, you should click “Start” to convert PowerPoint to video. The PowerPoint to video conversion will be finished in no minutes.

What’s more, the program will automatically open the designated folder where the generated is for you after the conversion.
So far, the whole PowerPoint to video conversion has been completed and you could enjoy this file on your LG Optimus 3D P920.

How to watch PPT files on Iphone 4S?

Want to watch PPT files on your Iphone 4S? The following guide will share you an easy way to watch PPT on Iphone 4S by converting PPT to Iphone 4S.

Iphone 4S, released on 4th, October, 2011, will come to the market on 14th, October. Some people say it represents Iphone 4 for Steve and others think it is Iphone 4 for speed. Anyway, it is an achievement of Steve Jobs and Timothy. D Cook. Compared to Iphone 4, the new features of Iphone 4s must be the dual-core A5 processor, 8MP camera, 1080p HD videos, Retina display screen, IOS 5, FaceTime and Siri Voice assistant.

Converting PPT to Iphone 4S is quite easy if we make use of a PPT to Iphone converter, which could easily convert PPT to Iphone 4S and many other portable devices as well as video foramts.

Next, we will look into how to convert PPT to Iphone 4S with this PPT to Iphone converter.

Step 1: just get a PPT to Iphone converter and install it.

Step 2: simply start the PPT to video converter and import the PPT file.

You could preview the PPT file by clicking the buttons under the view screen and choose an appropriate output video format. Then designate a folder for the developed video.

Step 3: next press “Customize” to set the timing, slide, music, audio and conversion of the generated video. The transition time should much more than 6 seconds. Also, you can add background music for the developed video.

Of course, if you have set the transition time on the source PPT file, the setting here won’t take effect.

Step 4: please click “Settings” to carry out the basic audio and video display effects of the generated video.

Step 5: when all the settings have been finished, you should click “Start” to convert PPT to Iphone 4S. The program will show you the PPT to Iphone 4S converting process. After the conversion, it will definitely open the folder where you saved the developed video.

Then, you could transfer the generated video to your Iphon4 4S and enjoy it on this machine.