Monthly Archives: July 2012

Tips on converting PPS to DVD

Is there any way to burn PPS to DVD for play the slides on DVD player?

Here I will recommend you an easy to use and powerful PPS to DVD converter which will help us to convert PPS to DVD as well as maintain all of the original animations, picture and even video clips, etc.

Additionally, this PPT to DVD converter also provides you some extra features to better the output DVD slides, such as add background music or record voice narration and even add logo or watermark.

Next, let’s look into how to use this PPT to DVD converter to convert PPS to DVD.
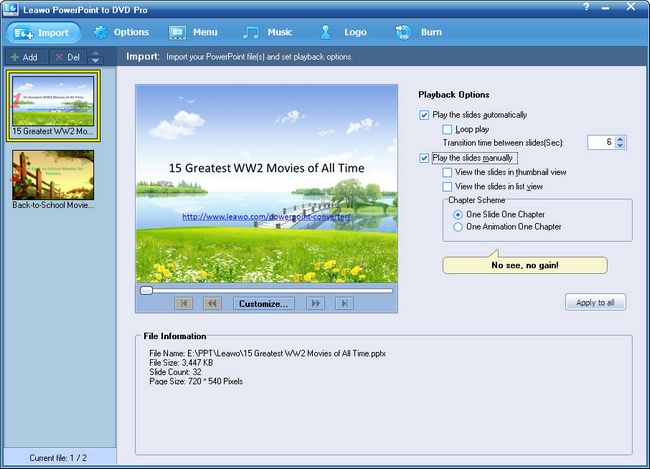
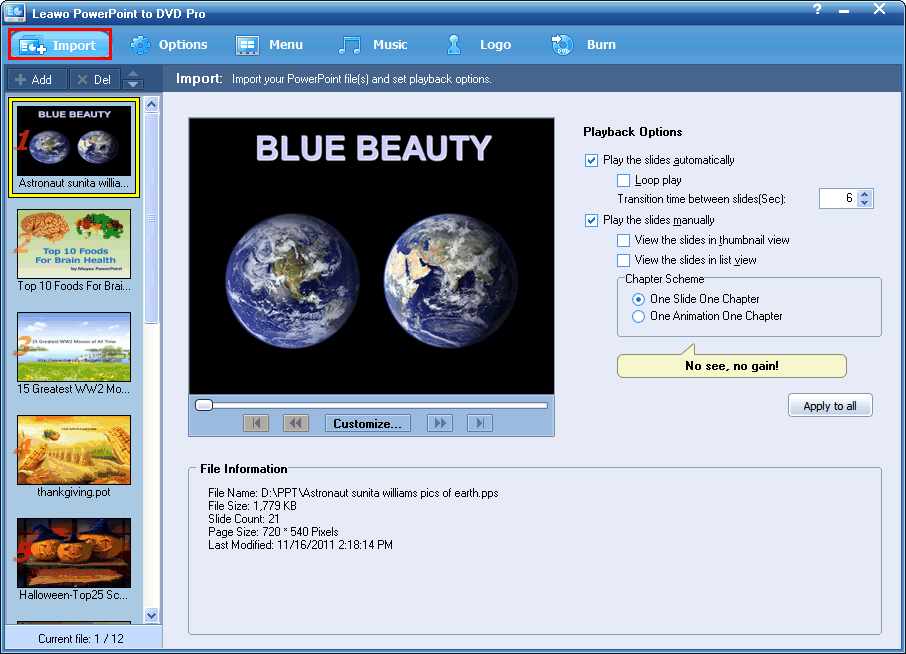
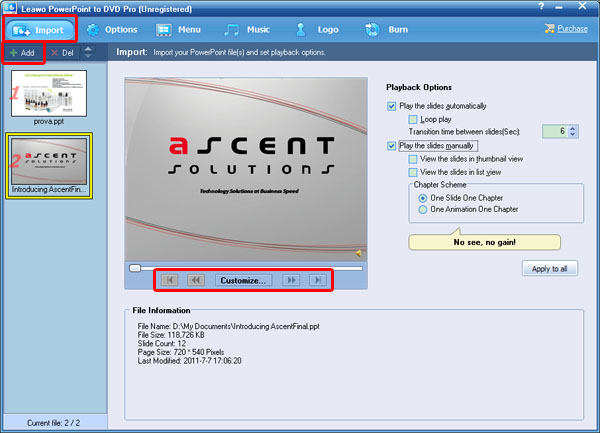
1. Input PPS files

Start the PPT to DVD converter. Simply click add or import icon to add PPS files. You are allowed to click the buttons under the view screen to preview the source slides.
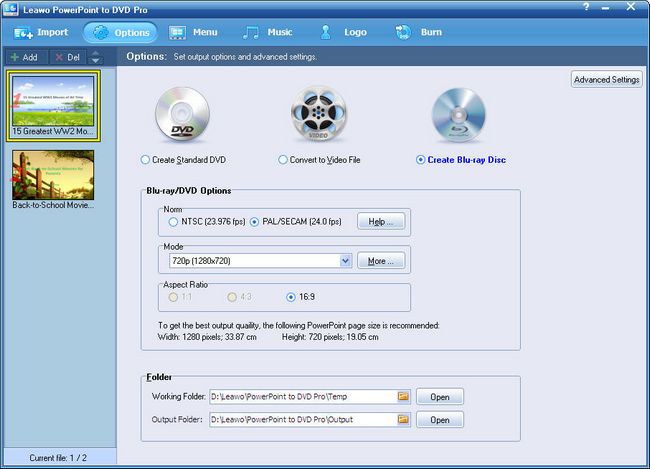
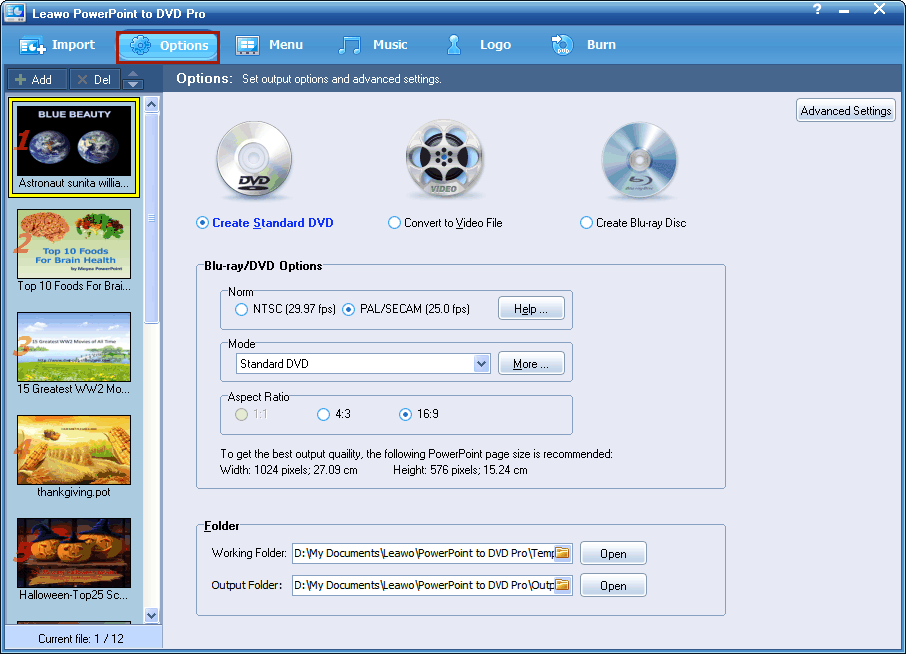
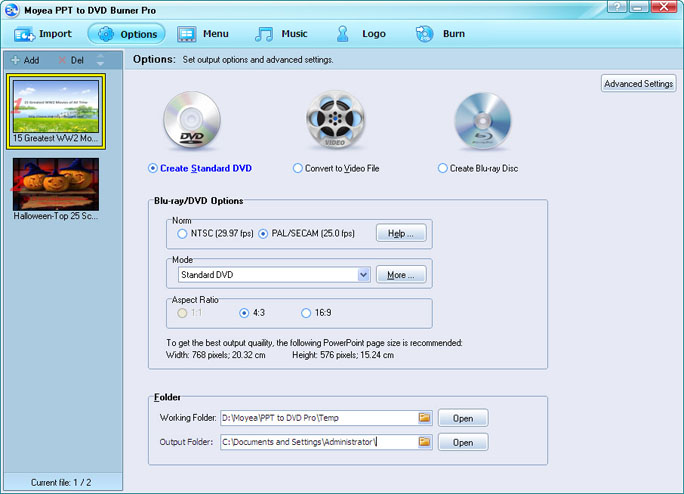
2. Set output

Move to “options” and choose “create DVD disc”. And then set the options such as norm, mode and aspect ratio and even working and output folder.

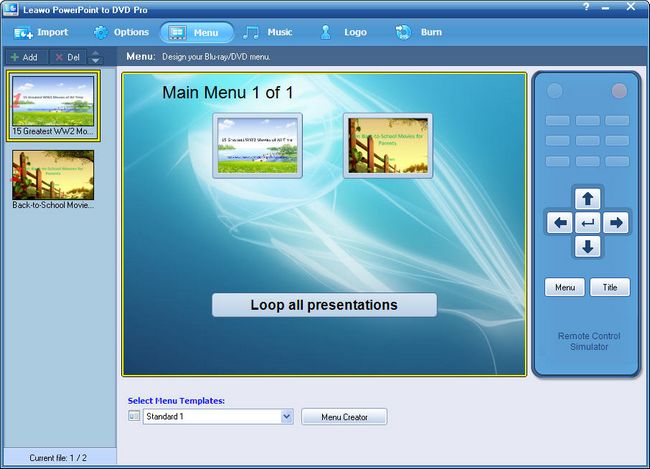
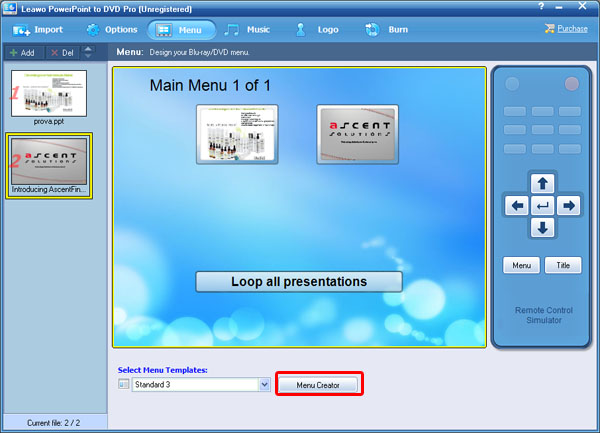
3. Generate DVD menu

Click “Menu” to enter the DVD menu panel. This PPT to DVD converter provides you multiple DVD menu templates for choosing. You can choose one you like or click “Menu Creator” to make your own DVD menu.

4. Add music or voice narration

If you want to add background music or record voice narration, you just need click “music” to finish it.

5. Add logo or watermark

Logo function is offered to add logo or watermark so as to credit your work.

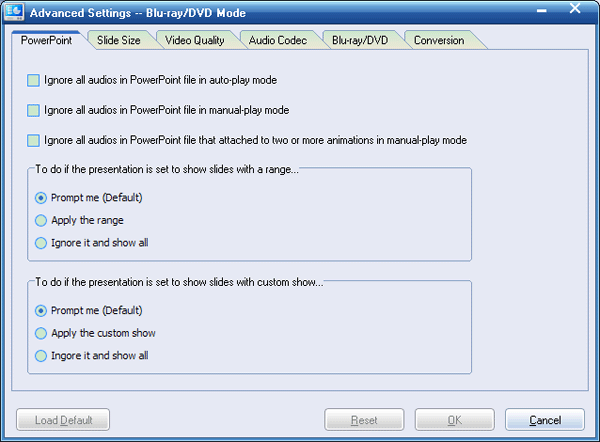
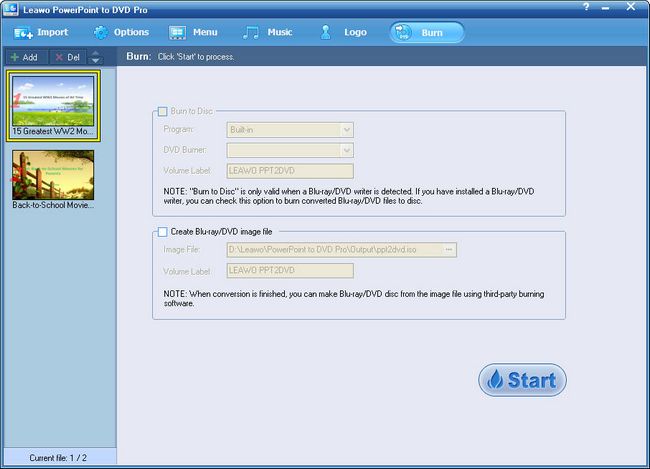
6. Settings and Convert PPS to DVD

Finally, simply click “burn” to enter the settings panel, where you should choose suitable “Image file” and “Volume label”. And then click “start” to start converting PPS to DVD with this PPT to DVD converter.

How to convert PPTX to DVD?

This is a guide about how to convert PPTX to DVD.

About PPTX

.pptx is the file extension of Microsoft PowerPoint 2007. If you see a .pptx file, it means the PPT file is designed by PowerPoint 2007.

How to convert PPTX to DVD?

To convert PPTX to DVD requires a third-party program named PPT to DVD burner which could effectively and conveniently convert PPTX to DVD as well as maintain all the original effects like animations, transition effects, pictures, video clips, etc. Additionally, using a PPT to DVD burner, you are allowed to design the DVD menu.

Next, look into how to convert PPTX to DVD with a PPT to DVD burner.

1. Load PPTX files

Run PPT to DVD burner and load the PPTX files by clicking “add” or “Import”. You can maximum add up to 12 PPTX files at each conversion.

2. Choose output

Simply press “options” and choose “create standard DVD” so as to convert PPTX to DVD. Here you are able to choose Norm, Mode and Folder. What’s more, you can click “advanced settings” for your PPTX to DVD conversion. You can set slide size, video quality, audio codec, DVD audio language code, and conversion status for your DVD output.

Learn details of advanced settings for DVD slideshow

PowerPoint: If your presentation goes with a sound file, you can choose to ignore it in the generated DVD. Particularly when two or more animations are included, for smooth playback on DVD players, you’d better choose to ignore the audio in manual mode.
Slide Size: Select a proper slide size for your DVD slideshow to play on TV. You can choose to keep current slide scale in later DVD playback or adjust the slide size as needed.

Video Quality: Higher video quality or smaller output file size? It’s up to you. To get the most thrilling video effect, choose “High Quality”.

Audio Codec: Two audio codecs are available, i.e. AC3 and MP2, for your PPTX DVD to play on a DVD player. Not sure which one should be? Then choose ‘AC3’, a standard DVD audio codec.

Blu-ray/DVD: Set the audio language codec for your DVD output. Choose to or not to disable DVD menus. In addition, you can also choose whether to show navigation buttons in manual-play mode.

Conversion: Check to make the audio portion mute when converting PPTX to DVD. If there is another file with the same name as your DVD file, you can choose to rename or override it.

3. Make DVD menu

If you like, you can choose a menu style from the predefined templates or create your own to make your Blu-ray output even better by clicking “Menu Creator”.

4. Convert PPTX to DVD

Finally, click “burn” to convert PPTX to DVD with this PPT to DVD burner.

Tips on how to burn PPT to DVD

If you are looking for solution to burn PPT to DVD as well as main all the original effects like animations, pictures and video clips, etc, then this paper will be your reference guide since it will show you tips on how to burn PPT to DVD.

Burn PPT to DVD could be very easy because you can make use of a PPT to DVD burner. This PPT to DVD burner can perfectly burn PPT to DVD as well as allows you make DV menu. With a friendly user interface, you can easily burn PPT to DVD with a few clicks and minutes. Next, let’s download the PPT to DVD burner and have a try on it to burn PPT to DVD.

1. Load the PPT files

Launch the PPT to DVD burner and click “add” or “import” to load PPT files. You can maximum add 12 PPT files at each conversion.

2. Choose output

In the menu bar, click “options” and choose “create standard DVD disc”. Adjust related terms such as Norm, Mode, Folder and advanced settings if necessary.

Related Terms
Norm: Refers to the TV standard for your DVD output. Generally, NTSC applies to American users while PAL applies to European users. If you are not sure which one it should be, click “help” to check it.
Mode: The mode of DVD output. The Aspect Ratio of ‘Create Standard DVD’ is composed of 4:3 and 16:9.
To learn more about aspect, encode size and display size, hit “More”.
Folder: Includes the paths for the working folder and the output folder. Make sure the two paths are different, for all the files located in the working folder will disappear with the completion of the conversion.

3. Develop DVD menu

Simply press “menu”, you will see the menu panel. Multiple DVD menu templates are provided for you to choose from. Choose one you like best or click “menu Creator” for making your own DVD menu.

You can make your own main menu and title menu with rich features in the Menu Creator. PPT to DVD Burner lets you customize a DVD menu with abundant background fill, frame styles, icon styles and frame colors.

4. Burn PPT to DVD

Finally click “burn” to enter settings and burn panel, where you can set some parameters and click “start” to finish burning PPT to DVD.

How to convert PPT to DVD?

Feel frustrated because you cannot watch your favorite PPT files on your DVD player and HD TV set? Now, this paper can help you much by providing you solution to convert PPT to DVD so as to enjoy PPT files on DVD player and HD TV set.

Converting PPT to DVD surely requires a PPT to DVD burner pro, which will achieve the conversion and also maintain the original effects such as animations, pictures, video clips, etc. additionally, you can use this PPT to DVD pro to add some extra features such as voice narration for each slide and watermark. What’s more, you can choose one DVD menu template for the pre-installed templates or make you own by using the DVD menu creator.

Following, please look into how to convert PPT to DVD with a PPT to DVD burner pro.

1. Run the program and add PPT files

Just run the PPT to DVD burner pro on your computer and click “add” to input PPT files. You can add up to 12 PPT files per conversion.

2. Choose output option

In the menu bar, click “options” and choose “create standard DVD disc”. Adjust related terms such as Norm, Mode, Folder and advanced settings if necessary.

3. Make DVD menu

Toggle to the Menu tab. The Blu-ray/DVD Menu interface appears. Multiple DVD menu templates are provided for you to choose from. Choose one you like best or click “DVD menu Creator” for making your own DVD menu.

You can make your own main menu and title menu with rich features in the Menu Creator. PPT to DVD Burner Pro lets you customize a DVD menu with abundant background fill, frame styles, icon styles and frame colors.

4. Add background music or voice narration

The Music feature gives you an alternative to sound inserting and narration recording in PowerPoint.

5. Credit your work by add logo or watermark

If you are afraid of unwanted modification to your or DVD slideshow, you can take advantage of the Logo feature in the PPT to DVD burner pro.
\

6. Convert PPT to DVD

Once everything is ready, it’s time to click “burn” to enter settings and burn panel.

Note: To burn your PowerPoint file directly to a DVD Disc, you should have a writable DVD and a third-party DVD burner on your PC.
Finally click “start” to convert PPT to DVD with this PPT to DVD burner pro. After conversion, you can easily enjoy the output on DVD player and HD TV set.

A simple guide of converting PowerPoint2DVD

If you get trouble in converting PowerPoint2DVD, then this paper will do you a favor as it will share you an easy and effectively way to convert PowerPoint2DVD using a few clicks.

Of course, converting PowerPiont2DVD requires a third-party program – PowerPoint2DVD converter, using which you are able to effectively achieve the conversion as well as maintain all the original effects such as animations, pictures and video clips, etc. What’s more, this PowerPoint2DVD converter provides you multiple beautiful DVD menu templates to choose from and even allow you to make your own DVD menu. You can even add some extra features for the output DVD slides show using this PowerPoint2DVD converter.

Next, get the PowerPoint2DVD converter and start the conversion from PowerPoint2DVD.

1. Load PowerPoint files

Start the PowerPoin2DVD converter. Press “add” or “Import” to load the PowerPoint files. You can import multiple files for batch conversion.

2. Choose output

Move to “options” and choose “create DVD disc”. And then set the options such as norm, mode and aspect ratio and even working and output folder.

3. Develop DVD menu

Click “Menu” to enter the DVD menu panel. Choose one you like from the pre-installed DVD menu templates. Or make your own by clicking “Menu Creator”, where you are allowed to use your own background music and picture, choose button styles and options.

4. Add extra features

This PowerPoint2DVD converter provides you music and logo functions for better output.
In “music”, you could add background music for the output slide share or record voice narration for better explaining the slides.
In “Logo”, you are able to click “logo” to add logo or watermark for the output DVD slide show to credit your work.

5. Converting

Finally, move to the burn panel by clicking “burn”. Set “image file” and “volume label” and click “start” to convert PowerPoint2DVD. This PowerPoint2DVD converter can quickly finish the conversion for you.

How to convert PPS to DVD?

This is a guide about how to convert PPS to DVD.

About PPS
Microsoft PowerPoint is a tool which is used to create elaborate presentations for business, personal and education purposes. This software is widely used nowadays. And PPS is a file format of PowerPoint slideshow.

How to convert PPS to DVD?
To convert PPS to DVD, we just need a PPT to DVD converter, which can effectively accomplish the conversion from PPS to DVD and PPT to DVD with the original animations, video clips and pictures. Additionally, this PPT to DVD converter allows you to customize the DVD menu and even add some additional features for the output DVD slideshow.

Download the trial version of PPT to DVD converter and look at how to convert PPS to DVD.

Step 1: load the PPS files

Start the PPT to DVD converter and press “add” or “Import” to input the PPS files. You can directly import maximum 12 PPS files at once for batch conversion.

Step 2: set output

Move to “options” and choose “create DVD disc”. And then set the options such as norm, mode and aspect ratio and even working and output folder.

Step 3: create DVD menu

Click “Menu” to enter the DVD menu panel. This PPT to DVD converter provides you multiple DVD menu templates for choosing. You can choose one you like or click “Menu Creator” to make your own DVD menu.

In “Menu creator”, you are allowed to use your own background music and picture, choose button styles and options.

Step 4: add voice narration

And then click “music” to add background music for the output slide share or record voice narration for better explaining the slides.

Step 5: logo or watermark

If you want to credit your work, you are able to click “logo” to add logo or watermark for the output DVD slide show.

Step 6: converting

Finally, move to the burn panel by clicking “burn”. Set “image file” and “volume label” and click “start” to convert PPS to DVD using this PPT to DVD converter.

Tutorial: how to convert PowerPoint to blu ray?

If you want to store your favorite PowerPoint files or just watch PowerPoint file on HD device, then converting PowerPoint to Blu ray must be a good choice because a Blu ray disc can well store large amounts of PowerPoint file as well as show these PowerPoint files in high definition.

Of course, we must get help of a PowerPoint to Blu ray converter if we need convert PowerPoint to Blu ray. Leawo PowerPoint to Blu ray converter, one of the most effectively PowerPoint converters in the world, can effectively convert PowerPoint to Blu ray, PowerPoint to DVD as well as PowerPoint to video. It can allow you to customize DVD menu, add additional effects of the PowerPoint file and convert PowerPoint to Blu ray without any technical skills on computer and software.

Download the PowerPoint to Blu ray converter and install it.
1. Add PowerPoint files

Launch the PPT to Blu ray converter. Click “import” or “add” to import the PPT files. You are allowed to preview the PPT files in view screen.

2. Set output

Move to the Options panel. Here you can choose “create blu ray disc”. And then set the blu ray options such as norm, mode and aspect ratio and even working and output folder.

3. Make DVD menu

In “Menu”, you will find that this PPT to Blu ray converter provides you multiple DVD menu templates such as standard, natural, business, etc. Just choose one you like. Or you can click “menu creator” to make your own DVD menu, where you are allowed to use your own background music and picture, choose button styles and options.

4. Additional effects

For adding more effects for the PPT file, you are able to click “Music” and “Logo” to add music and logo for the PPT file.
Choose your own music as background music or record voice narration or instruction for each slide in “Music”. Add watermark or logo for the PPT and even personalize the video layout in “Logo”.

5. Convert PowerPoint to Blu ray

For completing the conversion, move to Burn panel, where you can set “image file” and “volume label”. And then click “start” to convert PowerPoint to Blu ray. The conversion will be completed as quickly as you wish.